
“AI upscale to 4K” sounds like one button, but in practice you are usually choosing between generative enhancement (the model redraws your photo with more detail) and true upscaling (the model increases pixel count on the same bitmap). Both are valid — they solve different problems. Right after this intro you will see a live before/after (puppy photo), the exact prompt used for that run, then the rest of the guide: when to use each approach, a short ChatGPT workflow, sample prompts you can copy, and a quick look at other AI upscaling tools.
Before and after
Drag the divider (or use the slider) — left shows before, right shows after.
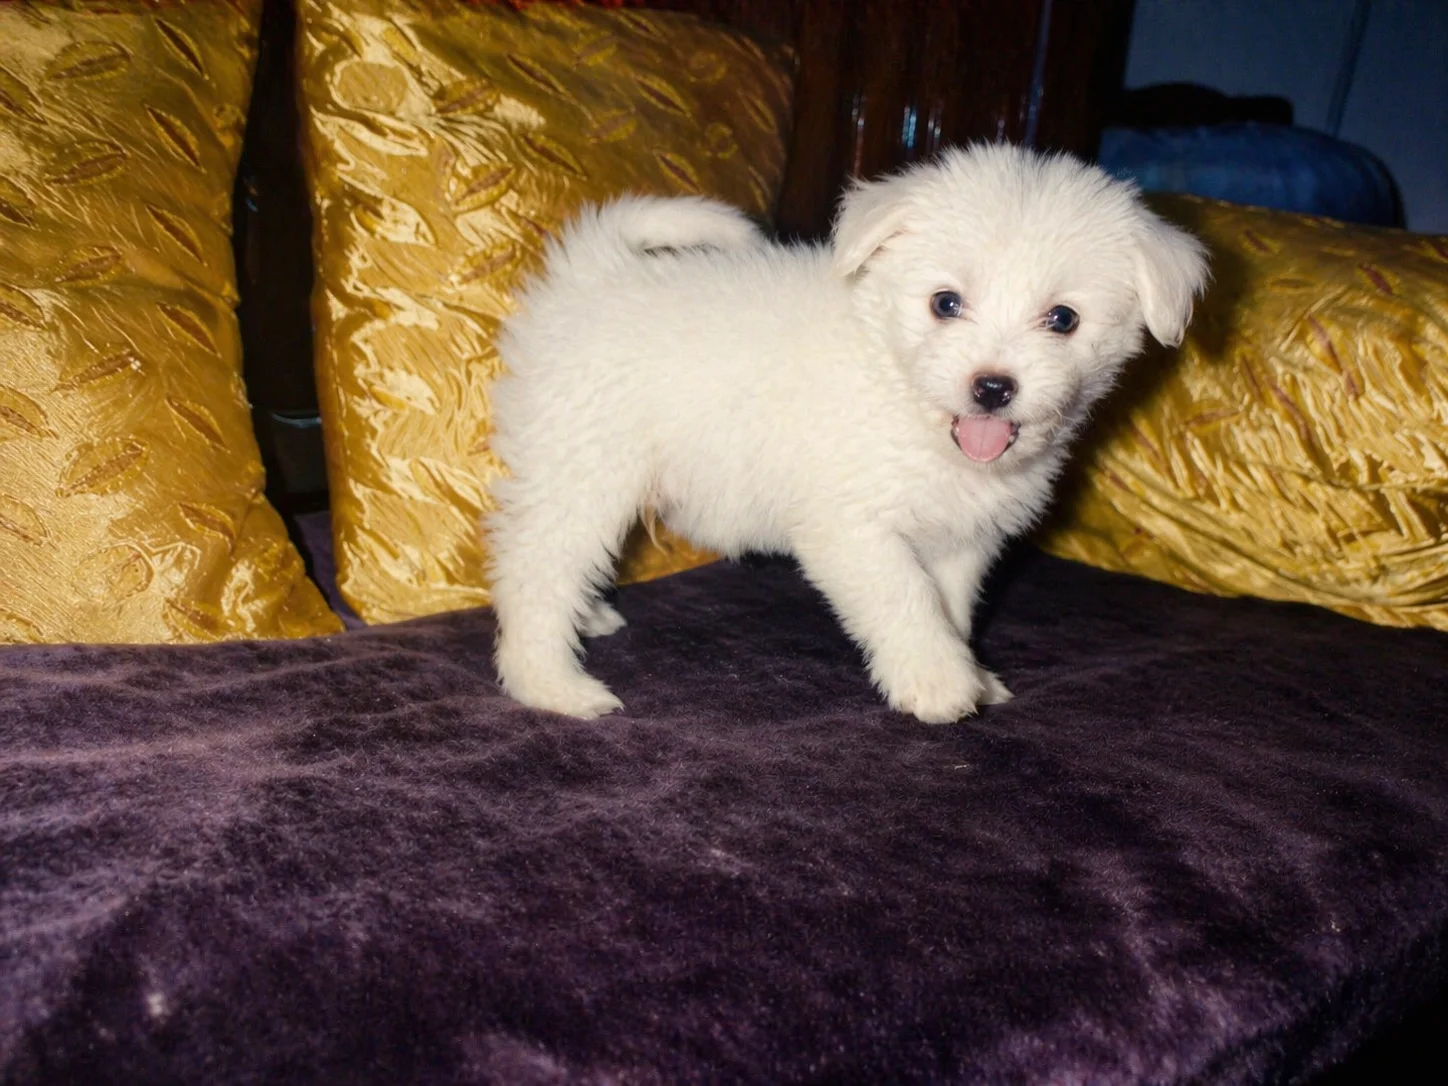
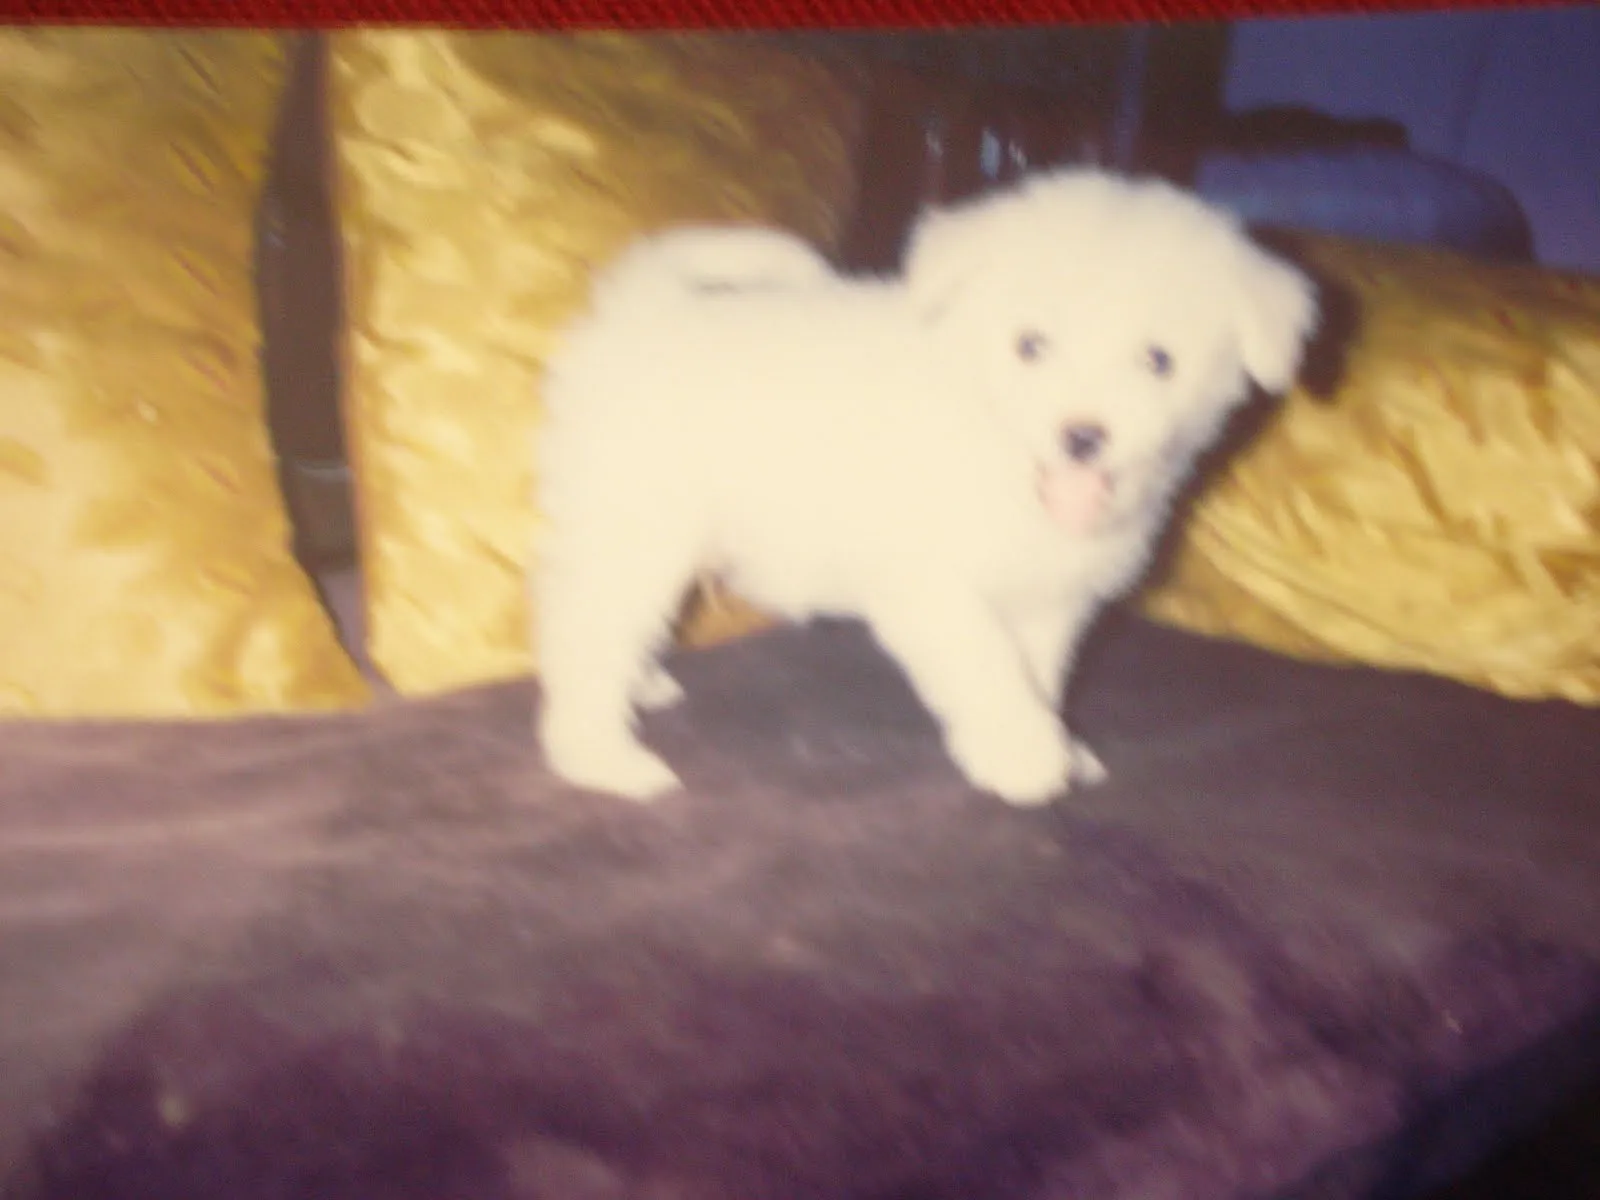
Prompt used for this example
Restore and upscale this old photograph toward 4K ultra HD. Repair scratches, dust, and fading where plausible; preserve era-appropriate color and facial identity. Rebuild fine detail in fabric and hair without inventing new people or objects. Output: photorealistic restoration, sharp focus, print-ready clarity, gentle grain reduction.
Two paths: generative 4K look vs dedicated upscaling
Path A — Prompted re-render (ChatGPT, Midjourney with image input, Flux, etc.)
You describe how the image should look at “4K quality”: sharper, cleaner, sometimes slightly reinterpreted. Great for soft phone shots, noise, and creative recovery. Not the same as mathematically enlarging every original pixel.
Path B — Dedicated AI upscaler
Tools built for super-resolution enlarge the file and infer detail. Best when you need print size, strict framing, or minimal style drift from the original capture.
Practical combo: use Path A to clean and reinterpret, export, then run Path B on the result if you need maximum dimensions for print or cropping.
ChatGPT / DALL-E workflow (quick)
- Upload your source image in a chat that supports image generation.
- Paste a prompt from the sample prompts section below (edit bracketed parts to match your photo).
- Ask for revisions with what failed (e.g. “faces softened too much — preserve pores and keep background identical”).
- If you need a larger file than the chat output allows, take the best result into an upscaler from Path B.
Native DALL-E sizes inside ChatGPT are capped below true 3840×2160 — your prompts still matter because they maximize perceived resolution and texture within the model’s canvas.
Sample prompts: copy, paste, customize
Use these after your upload line. Swap bracketed hints for your scene.
1. Portrait — phone photo to 4K-style look
Upscale this portrait to 4K ultra-high resolution. Preserve the subject’s identity, pose, and expression. Sharpen eyes, lashes, and hair strands; keep natural skin texture (no plastic skin). Reduce noise and JPEG artifacts. Output: tack sharp, photorealistic, professional studio portrait, soft background bokeh unchanged in layout.
2. Old photo or scan — restore and upscale
Restore and upscale this old photograph toward 4K ultra HD. Repair scratches, dust, and fading where plausible; preserve era-appropriate color and facial identity. Rebuild fine detail in fabric and hair without inventing new people or objects. Output: photorealistic restoration, sharp focus, print-ready clarity, gentle grain reduction.
3. Screenshot or UI — crisp edges and readable text
Upscale this screenshot to 4K-quality clarity. Keep all text legible and pixel-sharp where possible; preserve layout and UI colors. Reduce compression blocking; straighten subtle perspective if needed. Output: crystal-clear UI, tack sharp edges, neutral color accuracy, no added design elements.
4. Product flatlay — catalog / e-commerce
Upscale this product photo to 4K ultra HD commercial quality. Preserve product shape and label text. Sharpen materials (glass, metal, fabric weave); clean background to neutral or white studio if the original is already simple. Output: razor-sharp product edges, accurate color, e-commerce ready, soft natural shadow.
5. Landscape — social crop to 4K-style detail
Upscale this landscape to 4K ultra-high definition. Enhance foreground texture (grass, rock, water) and mid-ground detail; keep sky gradient natural. Improve dynamic range so shadows and highlights both hold detail. Output: RAW photography look, cinematic clarity, rich color depth, no halos.
6. Group or event photo — everyone sharper
Upscale this group photo toward 4K quality. Improve sharpness on every face; reduce motion blur where possible without warping features. Balance exposure across the frame. Output: event photography standard, natural skin tones, noise-free, consistent color.
7. Night photo — noise vs detail
Upscale this low-light photo to 4K-style clarity. Aggressively reduce noise while keeping real texture in lit areas. Preserve moody lighting; do not turn night into day. Output: clean shadows, tack sharp bright regions, cinematic night look.
8. Max detail / print intent (generative stack)
Re-render this image at maximum detail for large print. Preserve composition and main subject. Emphasize microtexture, edge acuity, and stable color; remove compression artifacts. Output: 4K ultra HD aesthetic, hyper-detailed, tack sharp throughout, professional color grading, no creative restyling beyond clarity.
Other AI upscaling tools (quick look)
These sit alongside ChatGPT-style prompting; many people use more than one in a single project.
- Topaz Photo AI / Gigapixel-style tools — Strong when you need larger output dimensions with controlled detail recovery; a common second step after a generative pass.
- Magnific-class detail engines — Push texture and crispness hard; watch faces and small text for over-sharpening.
- Adobe Firefly / Camera Raw — Useful if you already live in Photoshop or Lightroom and want generative enhance inside that workflow.
- Midjourney — If you use image references and upscale modes, you can chain upscale steps for art-directed stills.
None of these replace a clear prompt → review → revise loop; they extend it.
Related Resources
- 4K Photo Prompt for ChatGPT: Enhancement Templates — Ten focused enhancement and upscale templates
- ChatGPT 4K Image Prompts: Complete Guide — Generating new images at 4K-style quality
- ChatGPT 8K Ultra HD Image Prompts — Pushing clarity and print-oriented language further
- Browse 8K photography prompt templates — Library prompts for ultra-sharp looks
Conclusion
- Decide Path A (generative 4K-style re-render) and/or Path B (dedicated upscaler).
- Pick the sample prompt closest to your subject, edit bracketed hints, upload, run.
- Critique the result in words and iterate — specificity beats “make this 4K.”
- Keep your original and best output side by side (exports or screenshots) so you can judge sharpness, color, and identity drift before calling the job done.
You will get the most believable “4K” output when you tell the model what to preserve and what sharper means for your specific photo — not when you rely on a single magic phrase.